


Building Your Own Web Server: Part 1 — Theory and Foundations

Introduction
This is Part 1 of a multi-part series where we will build a complete HTTP web server from scratch.
In this series of articles, I want to show how to create an HTTP web server from scratch.
The goal isn’t to build a production-ready system — it’s to explore different approaches to implementing a server: starting from a simple, naive, single-threaded server and moving toward asynchronous, non-blocking designs similar to those used by modern high-performance servers like Nginx.
At each step, I’ll measure performance and share the results with you.
The main motivation behind this article is to take a deep look under the hood of how web servers work and to truly understand the fundamental concepts involved.
When I started writing, I had two goals in mind:
- Understand it thoroughly myself.
- Explain it clearly to you, step-by-step.
However, as I dove deeper, I realized that building a server also touches on many other foundational topics — like sockets, the HTTP protocol, and concurrency.
This led me down a bit of a rabbit hole! I had to make some choices about how deep to go into each topic without overwhelming you or oversimplifying important concepts.
Because of this, I’ve structured the article into two main parts:
- Theory — covering everything we need to know before we start coding.
- Implementation — where we’ll build different versions of our server.
Feel free to skim the theory if you’re already familiar with some topics, but I highly recommend at least glancing through it, as I’ll refer back to key concepts throughout the implementation stages.
In theory section we will learn:
- What a web server is and what it does
- How HTTP defines the rules of communication
- Why sockets are essential for network connections
- The structure of an HTTP message
- How persistent connections impact parsing
- What functionality we need to implement in our server
 What Is a Web Server?
Let’s start with a simple definition.
From a user’s perspective, a web server is an application that allows you to request specific information from a remote computer — and receive that information in a format you expect.
 So we know what a server does: serves information.
Now we need to understand how it does this.
The first step is enabling communication between the user and the remote machine — defining how to ask for specific resources and how to understand the response.
This is exactly what the HTTP protocol was created for: it defines the rules for communication between clients and servers, ensuring they can understand each other.
 HTTP – The Language of the Web
Now that we know a web server’s job is to deliver resources on request, we need to understand the language it uses to communicate: HTTP (HyperText Transfer Protocol).
HTTP defines how a client (like a browser) asks for a resource, and how the server answers.
Fortunately for us, we don’t need to dive deep into the full HTTP specification to build our first server.
We just need a basic understanding of:
- What an HTTP message looks like
- How to parse it correctly
- Why certain headers (like Content-Length and Connection) are critical
If you’re curious and want to explore further, the full spec is here: RFC 7230.
 Basic Structure of an HTTP Message
An HTTP request sent by the browser typically looks like this:

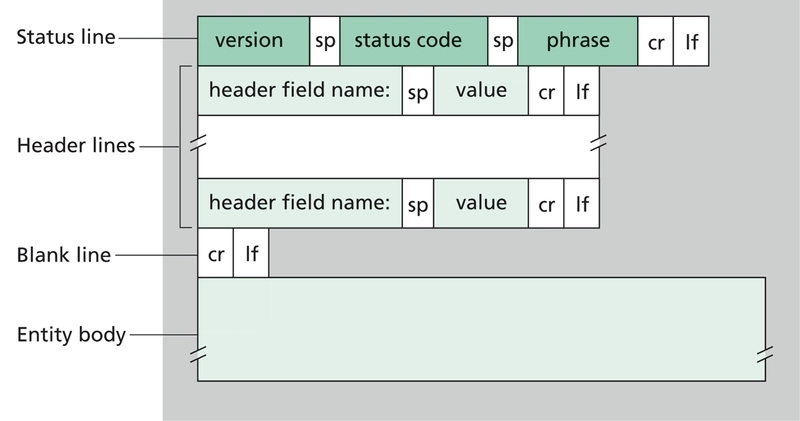
Where cr (Carriage Return) (ASCII 13, \r), lf ( Line Feed) (ASCII 10, \n) are used to note the termination of a line.
The blank line (\r\n) separates the headers from the body.
In many requests, especially GET, there may be no body at all.
Similarly, an HTTP response from the server looks like this:
 Parsing an HTTP Message
According to the spec,
The normal procedure for parsing an HTTP message is to read the
   start-line into a structure, read each header field into a hash table
   by field name until the empty line, and then use the parsed data to
   determine if a message body is expected.  If a message body has been
   indicated, then it is read as a stream until an amount of octets
   equal to the message body length is read or the connection is closed.
the basic parsing flow is:
- Read the start line (GET /index.html HTTP/1.1)
- Read headers into a dictionary until you hit a blank line
- If a Content-Length is present, read exactly that many bytes for the body
- Done!
And that’s exactly what we’ll implement later.
Tip: There’s a great summary of HTTP parsing in Python’s http.server module too – worth a look!
 Important: Content-Length and Persistent Connections
Earlier, we briefly mentioned that HTTP/1.1 introduced persistent connections.
Let’s dive deeper into what this means — because it has a huge impact on how our server will handle requests and parse incoming data.
 Persistent Connections: What Changes?
In HTTP/1.0, the typical behaviour was simple:
- Client opens a TCP connection
- Sends one request
- Receives one response
- Server closes the connection
Every request needed a brand new connection.
 Easy to understand.
 But expensive! Establishing a TCP connection involves a multi-step handshake, and doing that for every single image, CSS file, or small resource creates massive overhead.
 In HTTP/1.1, things changed.
Persistent connections (sometimes called Keep-Alive connections) became the default behaviour:
- The client and server keep the TCP connection open after a request-response cycle finishes.
- The same connection can be used for multiple requests and multiple responses.
This greatly improves performance — especially for pages with lots of resources.
Why Content-Length Matters So Much
Here’s the new problem persistent connections create:
When multiple requests and responses share the same socket, how can the server know where one message ends and the next one begins?
When we read from a socket, the data arrives as a continuous stream of bytes.
Imagine you call recv(1024) — you could get:
- Only part of a request
- Exactly one complete request
- A request and half of another one
- Three full requests packed together
There is no guarantee that one recv() call equals one HTTP message.
 It was a small but critical realization for me:
TCP is a stream-based protocol, not a message-based one.
It does not respect HTTP message boundaries at all.
So how do we split the stream correctly?
This is where Content-Length saves us.
The Content-Length header tells us:
- Exactly how many bytes belong to the message body.
- Once we parse the start line and headers, we use Content-Length to know how many bytes we must read to get the complete body.
- After that, we know the next byte belongs to the start of a new message — or there might be no next message yet.
 In practice, parsing looks like this:
- Read the start line and headers from the stream.
- Look for Content-Length in the headers.
- If Content-Length exists:
- Read exactly that number of bytes to get the body.
- After the body is fully read:
- If more bytes are available, start parsing the next HTTP message immediately.
- If Content-Length is missing (and no Transfer-Encoding: chunked is used), we might have to infer the end of the body by other means (e.g., closing the connection).
 Why This Matters for Our Server
Since we plan to implement a basic HTTP/1.1 server with persistent connections, our HTTP parser must:
- Correctly read and separate multiple messages arriving through the same connection.
- Handle incomplete messages (e.g., when the body hasn’t fully arrived yet).
- Never mix up message boundaries — even if multiple requests come one after another without any delays.
Without correctly handling Content-Length, even a simple browser reload could completely break our server!
That’s why in our first implementation, we will strictly require:
- Every client request must include a Content-Length header if it has a body.
- Our parser must rely on it to know exactly when a message body ends.
 HTTP Versions
Throughout this article, you may have noticed that we often referred to different versions of HTTP.
Therefore, it’s important to take a moment to discuss this concept more carefully.
Not all functionalities — especially modern ones — were available in the initial version of the protocol, HTTP/0.9.
The default and most widely used version today is HTTP/1.1, which already implements all the basic features necessary for building a functional web server.
In our implementation, we will use HTTP/1.1 as the primary protocol version between client and server and will focus on supporting its core features.
However, HTTP/1.1 is not the final step in the evolution of the protocol.
Over time, HTTP has undergone several important improvements, introducing many features that are crucial for modern web applications — such as multiplexing, better performance, and faster connection setup.
If you’re interested in a deeper dive into the protocol’s history and evolution, I highly recommend reading this excellent resource: MDN Web Docs — Evolution of HTTP.
To give you a clearer picture, here’s a simple table summarizing the major HTTP versions and the key features each one introduced:
| Version | Year | Key Features | Limitations |
|---|---|---|---|
| HTTP/0.9 | 1991 | – Very simple protocol- Only supports GET- No headers | – No status codes- No metadata- Plain HTML only |
| HTTP/1.0 | 1996 | – Introduced headers- Status codes- Content type & length | – Opens a new TCP connection for every request |
| HTTP/1.1 | 1997 | – Persistent (Keep-Alive) connections- Chunked transfer encoding- Pipelining (limited use)- Better caching support | – Head-of-line blocking- Still sequential on a single connection |
| HTTP/2 | 2015 | – Binary framing- Multiplexing over a single connection- Header compression- Prioritization of requests | – Still based on TCP (suffers from head-of-line blocking at transport layer) |
| HTTP/3 | 2022+ | – Runs on QUIC (UDP-based)- Faster handshakes- Better performance on unreliable networks- Built-in encryption | – Newer, not fully supported everywhere yet- More complex to implement |
 Sockets – How Servers Hear You
Now that we understand the language, we need to understand the ears — the mechanism that allows a server to listen for incoming HTTP requests.
That mechanism is the socket.
 What Is a Socket?
At the operating system level, a socket is an object that connects:
- An IP address (like 127.0.0.1) and
- A port (like 8080)
It acts as a door: all network traffic targeting that address and port is handed to your application through the socket.
In Python, creating a socket looks like this:
import socket

s = socket.socket(socket.AF_INET, socket.SOCK_STREAM)
s.bind(("127.0.0.1", 8080))
s.listen()
How Server Sockets Work (Summary)
Here’s the typical life cycle:
- Create a socket.
- Bind it to an address and port.
- Listen for incoming connections.
- Accept a connection.
- Receive a request via recv().
- Send a response via send().
- Close the connection — or keep it alive.
 Requirements: What Our Web Server Must Handle
Now that we understand the basic communication flow between client and server, it’s time to look at the web server from a developer’s perspective.
What tasks and challenges must we solve to build even the simplest working server?
Let’s break them down:
1. HTTP Parsing
When a user sends a request, it’s just raw data arriving through the socket.
The HTTP protocol defines how that data is structured — but it’s up to us to interpret it correctly.
 Goal: We need to implement a simple HTTP parser that:
- Reads the start line (like GET /index.html HTTP/1.1)
- Extracts important information, such as the requested URL
- Processes headers (especially Content-Length)
- Differentiates where one message ends and another begins (important for persistent connections)
In our first version, we’ll focus mainly on supporting simple GET requests and parsing enough headers to correctly understand message boundaries.
 2. Configuration Management: Defining How the Server Behaves
Once we successfully parse an HTTP request and extract the requested URL, the next big question is:
What should the server do with this request?
Unlike hardcoded logic (where every request is manually handled in code), modern web servers rely heavily on configuration files to define behavior dynamically — without changing the server’s internal code.
Our server must also support a configuration system that tells it:
- Which resources it should serve directly
- When and how to forward requests to other backend services
This flexibility is absolutely crucial even for basic web servers.
Two Modes of Operation
Modern web servers usually operate in one of two modes (or a combination of both):
 Mode 1: Serving Static Files
This is the simplest and most traditional use of a web server.
- When the server receives a request like /index.html, it looks into a specified directory on the server’s file system.
- If the requested file exists (e.g., /var/www/html/index.html), it reads the file’s contents and sends it back as the HTTP response.
- If the file is not found, the server returns a 404 Not Found error.
This mode is fast, efficient, and perfect for serving:
- HTML pages
- CSS stylesheets
- JavaScript files
- Images (PNG, JPG, SVG, etc.)
- Static JSON files
Example Configuration Rule for Static Files:
location /static/ {
    root /var/www/static/;
}
 Mode 2: Acting as a Reverse Proxy
In more complex architectures, the web server doesn’t always serve files itself.
Instead, it acts as a middleman between the client and a backend application.
- When the server receives a request, it forwards it to another application running elsewhere — often on a different port or even a different machine.
- It waits for the backend application to respond (for example, a dynamic HTML page or JSON data).
- Then it passes the backend’s response back to the original client.
This mode is essential for building dynamic web applications where the content is generated on-the-fly (user dashboards, APIs, login systems, etc.).
Example Configuration Rule for Reverse Proxying:
location /api/ {
    proxy_pass http://127.0.0.1:5000/;
}
Meaning: if a client requests /api/users, the server forwards the request to an application running locally on port 5000 (e.g., a Flask app).
 Configuration in Our Server
In our server, we will:
- Start simple: focus only on serving static files first.
- Later extend: add support for reverse proxying once basic functionality is reliable.
We will define a custom configuration file with a simple syntax inspired by Nginx.
Initially, the config file will:
- Map URL prefixes to file system directories for static serving.
Later, it will:
- Map URL prefixes to backend services for proxying.
 Wrapping Up: What We Learned
In this first part, we took a deep look under the hood of web server architecture.
We explored:
- What a web server actually is and what it must do
- How HTTP structures communication between clients and servers
- Why parsing HTTP messages correctly is critical (especially with persistent connections)
- How sockets act as the foundation for network communication
- Why configuration files give servers the flexibility they need
- The two main modes of a server: serving static files and acting as a reverse proxy
These are the core concepts that will guide every decision we make in the implementation phase.
 What’s Next
Now that we have a strong theoretical foundation, it’s time to move from ideas to action.
In the next articles, we’ll:
- Build our own basic web server step-by-step
- Start with a simple, single-threaded, blocking version
- Measure its performance
- Then gradually evolve it into a concurrent, non-blocking, highly efficient server — inspired by real-world architectures like Nginx
We’ll get our hands dirty with real code, but always staying grounded in the principles we just learned.
Thank You for Reading!
If you’ve made it this far, you already understand more about how web servers work than most developers ever do.
The next steps will be even more fun — we’ll see all these concepts come alive!
Stay tuned for the first lines of code in Part 2: Building a Single-Threaded Blocking Web Server.
Thanks for reading — I hope you found this deep dive as fascinating as I did while writing it. See you in the next part!


