


Supercharge Your Coding Mojo: Connecting This FREE MCP Server to Cursor

The API Documentation Nightmare We All Share
Let’s be honest—we’ve all been there. You’re in the zone, fingers flying across the keyboard, when suddenly you hit that dreaded roadblock: “Wait, what parameters does this endpoint accept again?”
The flow state crashes to a halt. You reluctantly tab over to your browser, hunt down the API docs, scroll through endless pages, and by the time you find what you need… poof! Your coding momentum has vanished into the ether. 
This constant context-switching between coding and documentation is the silent productivity killer that plagues API development. It’s like trying to cook a gourmet meal while running back and forth to the grocery store for each ingredient. Exhausting and inefficient!
But what if your AI coding assistant could just know your API specs without you having to explain them? What if it could generate perfect code based on your actual documentation without you playing API telephone?
Enter Apidog MCP Server – the game-changing bridge that connects your API documentation directly to Cursor’s AI brain. And trust me, as someone who’s spent countless hours muttering curses at incomplete API implementations, this tool is an absolute beast!
What’s This MCP Magic All About?
The Model Context Protocol (MCP) might sound like something from a sci-fi movie, but it’s actually a brilliant piece of tech that lets AI coding assistants tap directly into external knowledge sources. Apidog MCP Server implements this protocol specifically for API documentation, creating what I like to call an “API mind-meld” between your docs and your AI assistant.
Once set up, Apidog MCP Server automatically reads and caches your API documentation locally, making it instantly accessible to Cursor. The result? Your AI assistant gains API superpowers, understanding your endpoints, parameters, data models, and response formats without you having to spoon-feed this information.
This isn’t just a minor convenience—it’s a fundamental transformation of how we work with APIs. Instead of:
You → API Docs → Your Brain → Explain to AI → Code
The workflow becomes:
You → Direct Request to AI → Code (with AI accessing docs directly)
And let me tell you, after experiencing this streamlined workflow, going back to the old way feels like trading in your sports car for a horse and buggy. 
Setting Up Your API Mind-Meld in 3 Easy Steps
Ready to supercharge your Cursor with API knowledge? Let’s get this party started! The setup is surprisingly straightforward—even I managed it without my usual debugging meltdown.
Step 1: Grab Your Apidog Access Token
First, we need to give Apidog MCP Server permission to access your API documentation:
- Log into your Apidog account (create one if you haven’t already—it’s worth it!)
- Hover over your profile pic in the top-right corner
- Navigate to Account Settings > API Access Token
- Create a shiny new API access token
- Copy that token somewhere safe—you’ll need it in a minute
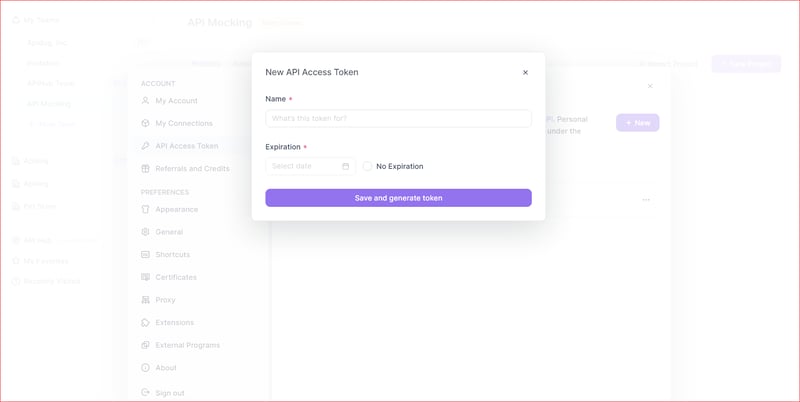
This token is like the VIP backstage pass that lets the MCP server access your API documentation. Guard it well, my friend!
Step 2: Find Your Apidog Project ID
Next, we need to tell the MCP server which API project to connect to:
- Open your API project in Apidog
- Click Settings in the left sidebar
- Look for the Project ID in the Basic Settings page
- Copy this ID for the next step

If you’re managing multiple API projects (you busy developer, you!), you’ll want to note which ID belongs to which project. Trust me, future-you will thank present-you for this bit of organization.
Step 3: Configure Cursor for API Enlightenment
Now for the fun part—connecting Cursor to your API documentation:
-
Create or edit the MCP configuration file in one of these locations:
- Global configuration:
~/.cursor/mcp.json - Project-specific:
.cursor/mcp.jsonin your project directory
- Global configuration:
-
Add this JSON configuration (your golden ticket to API bliss):
{
  "mcpServers": {
    "API specification": {
      "command": "npx",
      "args": [
        "-y",
        "apidog-mcp-server@latest",
        "--project-id="
      ],
      "env": {
        "APIDOG_ACCESS_TOKEN": ""
      }
    }
  }
}
-
Replace
-
Windows warriors: If the above config gives you trouble, try this alternative:
{
  "mcpServers": {
    "API specification": {
      "command": "cmd",
      "args": [
        "/c",
        "npx",
        "-y",
        "apidog-mcp-server@latest",
        "--project-id="
      ],
      "env": {
        "APIDOG_ACCESS_TOKEN": ""
      }
    }
  }
}
- Save the file and restart Cursor to apply the changes
That’s it! No complicated installations, no dependency nightmares, no sacrificing your firstborn to the coding gods. Just three simple steps and you’re ready to experience API development on easy mode.
Unleashing Your New API Superpowers
Now that you’ve connected Cursor to your API documentation, it’s time to flex those new muscles! Here are some mind-blowing ways to leverage this integration that have saved my bacon countless times:
 Generate Code Like a Wizard
Remember those tedious hours spent manually creating data models and API clients? Those days are OVER! Just ask Cursor to generate code directly from your API specs:
“Use MCP to fetch the API documentation and generate Java records for the Product schema and related schemas”
“Generate TypeScript interfaces for all data models in our API documentation”
“Create a Python client for the authentication endpoints according to our API documentation”
The first time I saw perfectly structured TypeScript interfaces appear based on my actual API models, I nearly fell out of my chair. It’s like having a senior developer who knows your API inside-out working alongside you!
 Keep Up With API Changes Without Losing Your Mind
We all know the pain of API evolution. You finally get your client code working perfectly, and then the backend team adds three new required fields. Thanks, backend team! 
With Apidog MCP, updating your code becomes trivial:
“Based on the API documentation, add the new fields to the Product DTO”
“Update this service class to handle the new parameters in the /users endpoint”
“Modify this client code to support the new authentication method described in our API documentation”
The AI will fetch the latest documentation and update your code accordingly. No more playing spot-the-difference between API versions!
 Documentation That Actually Gets Used
Let’s be real—most API documentation is about as exciting as watching paint dry, which is why details often get overlooked. But now you can effortlessly incorporate documentation details into your code:
“Add comments for each field in the Product class based on the API documentation”
“Generate validation rules for this form based on the constraints defined in our API documentation”
“Add error handling for all possible response codes documented for this endpoint”
This has been a game-changer for my code quality. My error handling is now comprehensive instead of the usual “catch everything and log ‘something went wrong'” approach I used to take. (We’ve all been there, no judgment!)
 Build Complete API Clients in Seconds
Need to implement a full API client? Instead of spending days on it, try:
“Generate all the MVC code related to the endpoint /users according to the API documentation”
“Create a complete React hook for interacting with the product management API”
“Implement a service class that covers all operations documented for the payment processing API”
I recently used this to generate a complete set of React query hooks for a complex API with 30+ endpoints. What would have taken days took minutes. MINUTES! I spent the rest of the day pretending to work while actually browsing memes. (Don’t tell my boss!  )
)
Pro Tips for API Documentation Ninjas
After weeks of using this setup, I’ve discovered some tricks that take your API development workflow from great to absolutely stellar:
Working with Multiple API Projects
If you’re juggling multiple APIs (my condolences), you can add multiple MCP Server configurations to your setup:
{
  "mcpServers": {
    "User API Documentation": {
      "command": "npx",
      "args": ["-y", "apidog-mcp-server@latest", "--project-id=user-api-id"]
      // env config here
    },
    "Payment API Documentation": {
      "command": "npx",
      "args": ["-y", "apidog-mcp-server@latest", "--project-id=payment-api-id"]
      // env config here
    }
  }
}
Name each server descriptively so the AI knows which documentation to reference. I learned this the hard way after getting user endpoints mixed with payment endpoints. That debugging session still haunts my dreams.
Using Standard OpenAPI Specs
Not using Apidog for your API documentation? No problem! Apidog MCP Server can read standard OpenAPI/Swagger files too:
{
  "mcpServers": {
    "Pet Store API Documentation": {
      "command": "npx",
      "args": [
        "-y",
        "apidog-mcp-server@latest",
        "--oas=https://petstore.swagger.io/v2/swagger.json"
      ]
      // env config here
    }
  }
}
This works with both remote URLs and local files. I’ve used this to connect legacy APIs that were documented long before Apidog existed, and it works like a charm!
Keeping Your Tokens Secure
If you’re sharing your MCP configuration in a code repository (common for team settings), don’t hardcode your access token! Instead:
- Remove the
"APIDOG_ACCESS_TOKEN": "line from your config" - Set the token as an environment variable on your machine
This simple step has saved me from the embarrassment of accidentally sharing API tokens in public repositories. Not that I’ve ever done that… 
Mastering the Art of AI Prompting
To get the most out of your API-powered AI, be specific in your requests:
- Specify the source: “Based on our User API documentation…”
- Reference specific endpoints: “Using the /users/register endpoint…”
- Be clear about output format: “Generate TypeScript interfaces…”
- Ask for explanations: “Explain how the pagination works according to our API docs”
The more specific you are, the more accurate the results. It’s like the difference between asking someone to “get food” versus “pick up the large pepperoni pizza with extra cheese from Joe’s Pizza on Main Street.”
The Future of API Development Is Here (And It’s Awesome!)
Connecting Apidog MCP Server to Cursor isn’t just a neat trick—it’s a glimpse into the future of software development. This integration transforms API documentation from a static reference into a living, breathing part of your development workflow.
The days of context-switching between documentation and implementation are over. The era of manually translating API specs into code is behind us. We’re entering a new age where API documentation directly informs and enhances the development process through AI assistance.
As someone who’s spent years wrestling with API integration challenges, I can confidently say this approach has revolutionized my workflow. Tasks that used to take days now take hours. Problems that used to cause headaches now solve themselves. And the quality of my API implementations has improved dramatically.
So what are you waiting for? Set up this integration today and experience the API development workflow of the future. It is FREE! Your productivity will thank you, your code quality will improve, and most importantly, you’ll reclaim those precious hours previously lost to API documentation purgatory.
Happy coding, and may your API implementations be forever bug-free!


